Storage Ideas / Tips
Making A DIY Installation Look Like a Pro!
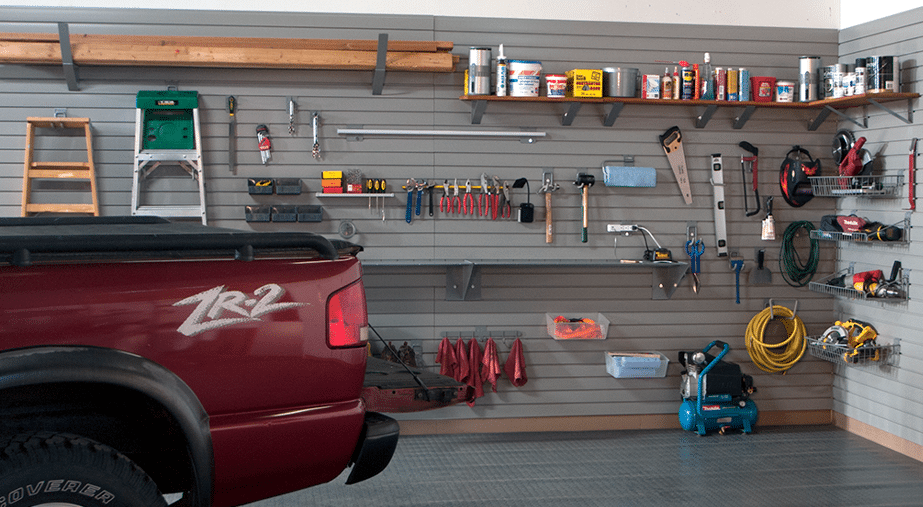
When looking at photos online you see the whole garage space outfitted with slatwall, and let’s be honest we all want that dreamy organized garage that slatwall can give us. However, we don’t all have the budget to hire a contractor to do the work. Here are some tips from the pros when it comes to installing slatwall so you can get the Pro look yourself!
Proper Measurements
Take the time to measure your space, what you love about the inspirational photos is the floor to ceiling look. Be sure to measure correctly saving you time on the back end. Slatwall comes in 15” or 12”. If ordering 15” panels note that you need 5 panels to get floor to ceiling, and with 12” high panels you will need 7-8 panels, (depending on how perfectly straight your walls are).
Installation Options
When it comes to installing slatwall you have 2 options. Hidden fastener installation or screw installation. Both are easy but the pro of using the hidden fastener is its strength allowing you to hold heavy items on the wall and its seamless professional look.
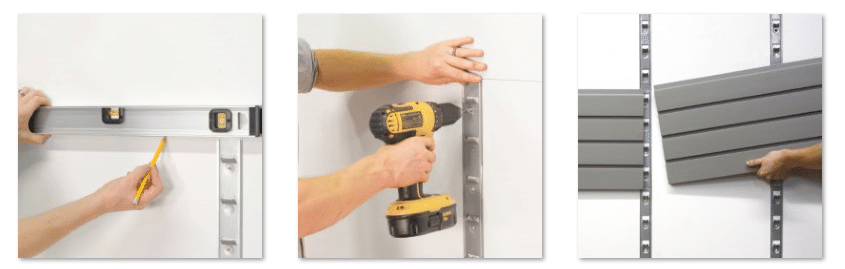
Hidden Fastener Installation
One person can easily install slat wall with the hidden fastener method with these easy steps:
- Draw a level line at the top of your wall where the top panel will sit. Mark the location of the studs.
- Screw the InstallStrips (hidden fasteners) into the studs. Continue this around the room and down the wall where you will be hanging slatwall.
- Starting at the bottom of the wall place the wall panels on the installstips. Then move up the wall until you have a floor to ceiling look.
Screw Installation
One person can install slat wall with screws but it would be best if there is a second person to help hold the 8 foot panels.
- Mark your studs on the wall, and draw a level line at the bottom point of where the slatwall will go.
- Place the first panel on the line and level it. Mark where the studs are on the panel.
- Screw through the groove of the slatwall into the stud. Continue adding panels until your first row is complete.
- Move to the second row and repeat until you have reached your desired height.
When picking screws, you can use any traditional 1 5/8” screw but to get the Pro look be sure to get color matching screws from the manufacture, this way you don’t see them.

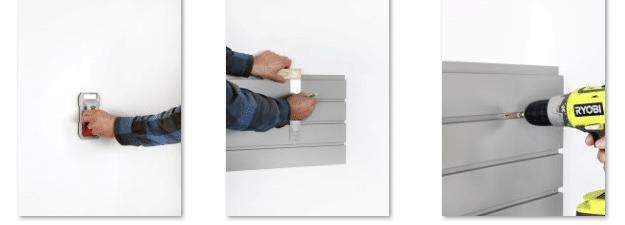
Finishing Details
Now that you have the wall panels up, to really get the professional look you want, it’s time to add trim and box extenders if you have outlets you installed around.
Trim
There are many options for trim, you may need a different trim for each part of your job. One to hide the seams where the panels meet, one for the corners to hide where the panels meet. Another to wrap the edges near doors and around window. Just get a color matching option for each part of your project.

Now that you know how simple it is to get a pro installed slatwall garage its time you start your project!